
FlowSmart: Practical Insights on In-line Water Filters for Home
Clean water at the point you use it—whether that’s the refrigerator, ice maker, coffee machine, or a dedicated chilled-water faucet—can make a noticeable difference in taste, appliance longevity, and convenience. In-line (or inline) water filters are compact, low-profile devices installed directly into a water line to treat a single outlet. They’re inexpensive, quick to install, and often DIY-friendly. This long-form article explains what in-line filters do, how they work, the media and technologies available, realistic performance expectations, sizing and installation guidance, maintenance best practices, certification and testing, how they fit into a layered home water-treatment strategy, selection and purchasing criteria, troubleshooting tips, and a buyer-ready checklist so you make smart choices that deliver measurable benefits.https://yourwatergood.com/product/whole-house-water-filtration-system-for-home/

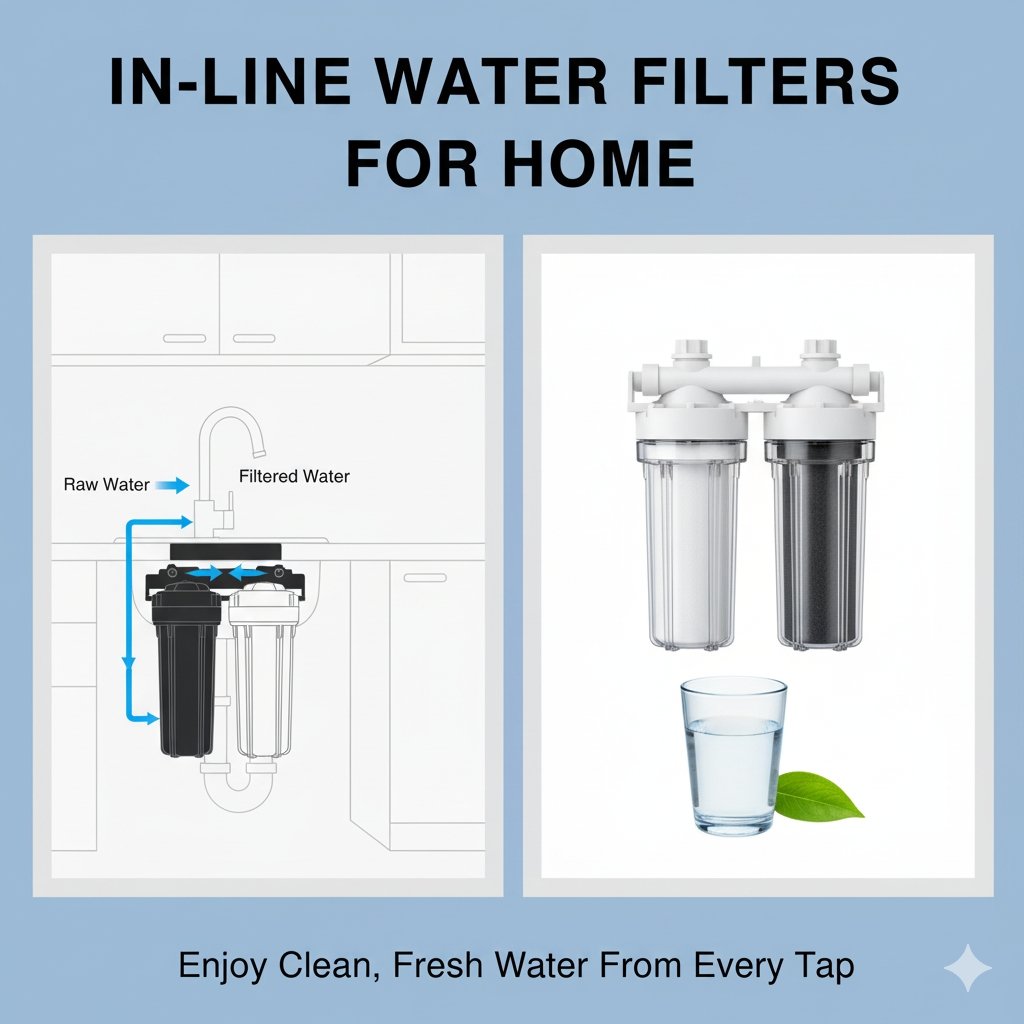
What is an in-line water filter and why use one?
An in-line water filter is a compact cartridge or module placed directly in the plumbing feeding one appliance or faucet. Unlike under-sink or whole-house systems, in-line filters treat a single point of use. Typical use cases include:
- Refrigerator water lines and ice makers (reduce ice cloudiness, improve flavor)
- Coffee and espresso machines (improve taste, reduce scale and wear)
- Under-counter chilled-water dispensers and filtered water taps
- Ice machines and small beverage equipment in home bars
Why choose an in-line filter? The main advantages are simplicity, cost-effectiveness, minimal footprint, and fast installation. If your priority is improving ice clarity and the taste of beverages at a single outlet, an in-line filter is often the most practical solution. It avoids the cost, plumbing changes, and space requirements of larger systems while delivering focused performance where it matters most.
How in-line filters work: core principles
Most in-line filters perform one or more of these basic functions:
- Sediment removal: traps sand, rust, and other particulates to protect downstream components. Typical micron ratings range from 1 µm (fine) to 20 µm (coarse).
- Adsorption (carbon): activated carbon adsorbs chlorine, chlorinated disinfection byproducts, many VOCs, and other taste/odor compounds. Carbon comes in granular forms (GAC) or dense carbon block. Carbon block usually provides finer particulate filtration and higher adsorption efficiency for a given volume.
- Catalytic carbon / KDF: catalytic carbon helps remove chloramines; KDF (a copper-zinc alloy) can reduce some metals and inhibit microbial growth in stagnant lines.
- Membrane filtration (UF/mini-RO): less common inline, but ultrafiltration (UF) modules can exclude bacteria and cysts; micro-RO modules exist but are limited by pressure and waste requirements.
- Specialty adsorbents: some inline modules incorporate media aimed at PFAS, specific VOCs, or heavy metals; these require independent validation.
An in-line filter’s effectiveness depends on media type, contact time, flow rate, and contaminant chemistry. Because inline modules are small, designers prioritize media with high adsorption density (carbon block) or optimized flow paths to maximize contact time within limited volume.
Types of in-line filters and their typical uses
1) Sealed disposable capsules
Small, self-contained modules that attach via push-fit or threaded fittings. They are replaced entirely when spent—very convenience-oriented.
- Best for: refrigerators, ice makers, portable coffee machines.
- Pros: no cartridge fiddling, compact, cheap.
- Cons: more waste per cartridge, limited media volume.
2) Inline canisters with replaceable cartridges
Slightly larger housings that accept replaceable carbon or sediment cartridges. Offer better service life and lower waste per service cycle.
- Best for: under-counter dispensers, espresso machines, applications where replacement frequency should be lower.
- Pros: reduced consumable waste, larger media capacity, better performance.
- Cons: slightly larger footprint, some basic plumbing skills needed.
3) Carbon block inline modules
Dense carbon block modules with integrated fittings that provide both particulate reduction and adsorption.
- Best for: taste & chlorine removal, lead reduction if certified.
- Pros: efficient adsorption, lower fines, good for point-of-use drinking water.
- Cons: higher pressure drop at very high flow rates.
4) Catalytic carbon / KDF inline modules
Designed for chloramine or metal control, often combined with carbon to broaden capability.
- Best for: supplies treated with chloramine or where mild metal control is needed.
- Pros: effective for specific disinfectants and metals.
- Cons: larger bed depth is often required for reliable chloramine removal.
5) UF / microfiltration inline modules
Membrane-based inline modules that remove bacteria, cysts, and fine particulates.
- Best for: situations where microbial safety is a concern (but only when matched to correct feedwater quality).
- Pros: effective microbiological barrier.
- Cons: not a panacea for chemical contaminants; membranes require care and proper pressure.
Realistic expectations: what in-line filters can and cannot do
In-line filters are excellent at what they were designed for: sediment trapping, chlorine and taste/odor reduction, and appliance protection. However, they have limitations:
- Do expect: improved taste and odor, clearer ice and beverages, protection for solenoids and valves in appliances, reduced sediment.
- Do not expect: complete removal of dissolved inorganic ions (hardness, sodium), reliable removal of all PFAS without specialized media and lab validation, or whole-house treatment.
- Health-related reductions: only buy cartridges with NSF/ANSI 53 (health effects) certification for claimed contaminant reductions like lead. For taste and aesthetic claims, NSF/ANSI 42 is the relevant standard.
Put bluntly: if your water issues are taste and particulate-based at a single outlet, an inline filter is often a perfect fit. If you need broad health-oriented contaminant removal across a range of in-home uses, combine inline modules with under-sink RO or a whole-house solution.
How to size and select an inline filter
Step 1 — Diagnose the problem
Get a basic water test or review your municipal water quality report to determine whether chlorine, chloramine, turbidity, iron, lead, PFAS, or other contaminants are present. This diagnosis dictates media choice.
Step 2 — Match flow requirements
Check the appliance’s typical flow and pulse characteristics. Refrigerators commonly draw small, steady flows; espresso machines may demand short bursts at higher flow rates. Select a module rated for the peak flow and pressure the appliance needs. Pay attention to manufacturer specs for maximum continuous flow and pressure drop.
Step 3 — Choose the right media
- Chlorine/taste: carbon block or GAC.
- Chloramine: catalytic carbon or staged treatment with sufficient contact time.
- Sediment protection: PP cotton or depth filter in 1–10 µm ratings depending on particulate size.
- Microbial concern: UF modules or combine with UV if necessary.
- PFAS/target contaminants: specialized adsorbents validated with independent lab data.
Step 4 — Consider cartridge capacity and replacement interval
Manufacturers often specify the rated gallons or months of life. Estimate usage: daily drinking volume, ice production, and frequency of use. For inline filters that serve appliances, replacement every 6–12 months is common; heavy-use scenarios demand more frequent changes.
Step 5 — Confirm fittings, materials, and warranty
Match tubing size (1/4″, 3/8″, etc.), pressure rating, and ensure all wetted materials are certified for potable water contact. Check warranty terms and replacement part availability.
Installation basics: common steps and best practices
Most in-line installations are straightforward for a competent DIYer. Tools commonly needed: tubing cutter, wrench or pliers, Teflon tape (for threads), zip ties or mounting hardware, and a bucket or towel for initial flush.
Typical install steps:
- Locate and depressurize the appliance line (shut off water and open a downstream tap).
- Choose a mounting spot near the appliance with room for cartridge replacement—avoid cramped spaces that complicate service.
- Cut tubing squarely and insert into push-fit connectors or secure onto barbed fittings with hose clamps. Confirm flow direction arrow on cartridge.
- Mount cartridge securely with bracket to relieve stress on fittings.
- Slowly restore water and check for leaks.
- Flush per instructions — carbon filters often require significant flush volume to remove fines and condition the bed.
- Record the installation date and set a replacement reminder.
For refrigerators, inline cartridges typically connect to 1/4″ tubing between the shutoff valve and the fridge inlet. If your installation requires drilling a faucet hole or complex drain/air-gap fittings, hire a plumber.
Maintenance, replacement, and monitoring
Replacement cadence
Replacement intervals vary by cartridge capacity and water quality. Common ranges:
- Disposable capsules: 3–12 months.
- Larger replaceable cartridge modules: 6–12 months.
- High-load environments: change more frequently as indicated by taste, odor, or flow reduction.
Indicators for replacement
- Return of chlorine taste or odor.
- Noticeable decline in flow at the appliance (sediment loading).
- Manufacturer’s rated gallons or calendar interval reached.
Practical maintenance tips
- Keep spare cartridges on hand—cheap insurance against unfiltered operation.
- Flush new cartridges thoroughly before first use.
- Label cartridge housing with install and expected replacement date.
- If you experience persistent taste or performance issues after replacement, confirm proper installation and that the correct cartridge type was used.
Certifications and testing to verify performance
When performance and health claims matter, rely on independent certification and test data:
- NSF/ANSI 42 — Aesthetic effects (chlorine, taste, odor).
- NSF/ANSI 53 — Health effects (lead, cyst reduction, some VOCs).
- NSF/ANSI 401 — Emerging contaminants (pharmaceuticals, some chemicals).
- WQA Gold Seal — Independent performance verification in some cases.
For targeted contaminants like PFAS, request specific lab test reports showing percent removal at the flow rates you plan to use. Beware of vague marketing claims—insist on a test report that names the contaminant, test concentration, flow rate, and percent reduction.
Inline filters in a layered home water strategy
A layered approach pairs the strengths of different treatment types:
- Point-of-entry (whole-house) sediment/carbon provides broad protection for appliances and improves overall water aesthetics. Example: a whole-house sediment pre-filter extends the life of small inline cartridges used at appliances. (See a representative whole-house system: https://yourwatergood.com/product/whole-house-water-filtration-system-for-home/.)
- Inline point-of-use modules for refrigerators, coffee machines and ice makers deliver targeted polishing with minimal footprint.
- Under-sink RO or multi-stage POU for households requiring low-TDS or health-related contaminant removal at drinking taps.
Combining solutions reduces replacement frequency and matches treatment complexity to actual needs—no overkill, no gaps.
Comparing inline filters to alternatives
Inline vs under-sink systems
- Inline: cheaper, smaller, easier to install—best for single outlets.
- Under-sink: larger media capacity, multi-stage, can include RO—best for certified health claims or high-volume drinking water needs.
Inline vs whole-house systems
- Inline: focused, lower-cost, point-of-use polish.
- Whole-house: protects all fixtures, reduces scale and chlorine exposure everywhere, but is bulkier and costs more.
Select technology based on scale of problem and desired coverage: targeted improvements are often best served by inline modules, while system-wide issues justify larger point-of-entry solutions.
Common troubleshooting scenarios
Low flow at appliance after installation
- Likely clogged sediment or undersized cartridge; check for kinked tubing or blocked inlet, and replace if necessary.
Persistent off-taste after replacing filter
- Insufficient flushing of the new carbon cartridge; flush per instructions for the required liters, then retest. If taste remains, confirm the cartridge type and check for upstream contamination.
Leaks at fittings
- Re-seat push-fit connections, check for damaged tubing, or tighten hose clamps on barbed fittings. Replace worn O-rings.
Air in line or sputtering
- Purge air by running water for several minutes; ensure proper seating of tubing and that no intermittent air ingress occurs at connections.
When problems persist, consult the vendor’s support resources or the installation guide.
Buying checklist: how to choose the right in-line filter
- Identify the target issue (taste, chlorine, sediment, chloramine, PFAS, microbial).
- Get a basic water test or utility water quality report to guide media selection.
- Confirm flow and pressure requirements for the appliance and choose a module rated accordingly.
- Choose media appropriately: carbon block for taste/chlorine; catalytic carbon for chloramine; PP sediment for particulate protection; UF for microbes.
- Verify certifications and test reports for health-related claims (NSF/ANSI 42/53/401).
- Match fittings and tubing sizes (1/4″, 3/8″, etc.).
- Check replacement cycle and cost to understand true operating expense.
- Confirm installation requirements and whether you’ll DIY or hire a pro.
- Read user reviews focusing on maintenance experience, not just initial praise.
- Keep spare cartridges and a maintenance log to avoid downtime.
Environmental considerations
Inline filters are waste-generating consumables. Reduce impact by:
- Choosing replaceable-cartridge housings rather than sealed disposable capsules where feasible.
- Buying larger-capacity cartridges to lengthen time between replacements.
- Recycling used cartridges if the vendor or local program supports it.
- Purchasing from manufacturers with responsible sourcing and lower-impact media (e.g., certified coconut-shell carbon where appropriate).
Balance convenience with sustainability and plan disposal appropriately.
Practical examples: typical inline setups
Refrigerator + inline carbon capsule
- Cartridge: carbon block inline capsule rated for refrigerator flow.
- Expected life: 6–12 months depending on usage.
- Benefit: clearer ice, improved beverage taste, protection of fridge lines.
Espresso machine + in-line sediment + carbon canister
- Setup: 5 µm PP sediment cartridge upstream of a carbon canister to reduce particulates and chlorine.
- Expected life: sediment 3–6 months; carbon 6–12 months.
- Benefit: improved flavor, reduced scale/hardware wear, extended boiler life.
Home bar drinks dispenser + high-capacity inline carbon block
- Setup: larger inline canister with replaceable carbon block for heavy entertaining use.
- Expected life: 6–12 months or specific gallon rating.
- Benefit: consistently good-tasting cocktails and reduced complaints from guests.
Final thoughts
In-line water filters for home are a practical, economical way to improve water quality exactly where you need it most. When chosen and installed correctly, they deliver clearer ice, better-tasting beverages, and extended appliance life with minimal footprint and modest ongoing cost. The keys to success are diagnosing the real water problem, selecting the correct media, sizing the cartridge for flow and longevity, following recommended flushing and replacement practices, and pairing inline modules with appropriate pre-filtration or whole-house protection when necessary. For households that want system-level protection in addition to point-of-use convenience, consider pairing inline modules with a point-of-entry system for balanced performance—see an example whole-house staging option here: https://yourwatergood.com/product/whole-house-water-filtration-system-for-home/.
With the right inline solution in place, a small, inexpensive upgrade can deliver daily improvements in taste and convenience that everyone in the home will notice.