
Flowline Focus: Everything You Need to Know About In-Line Water Filtration Systems for Home
Clean water at the point of use—from crystal-clear ice to better-tasting coffee—can transform everyday moments. In-line water filtration systems are an elegant, space-saving way to deliver that improvement exactly where you need it. This article explains what in-line systems are, how they work, the different media and technologies available, realistic performance expectations, installation and maintenance best practices, sizing and selection guidance, certification and testing to trust, practical troubleshooting, cost estimates, environmental tradeoffs, and a decision checklist so you can pick the right in-line solution and make it last.
If you’re planning a broader household strategy (protect appliances, reduce chlorine at every tap), consider pairing an in-line point-of-use solution with a point-of-entry whole-house system for upstream protection. For a reference whole-house option and to better understand system-level staging, review this product: https://yourwatergood.com/product/whole-house-water-filtration-system-for-home/.
What is an in-line water filtration system?
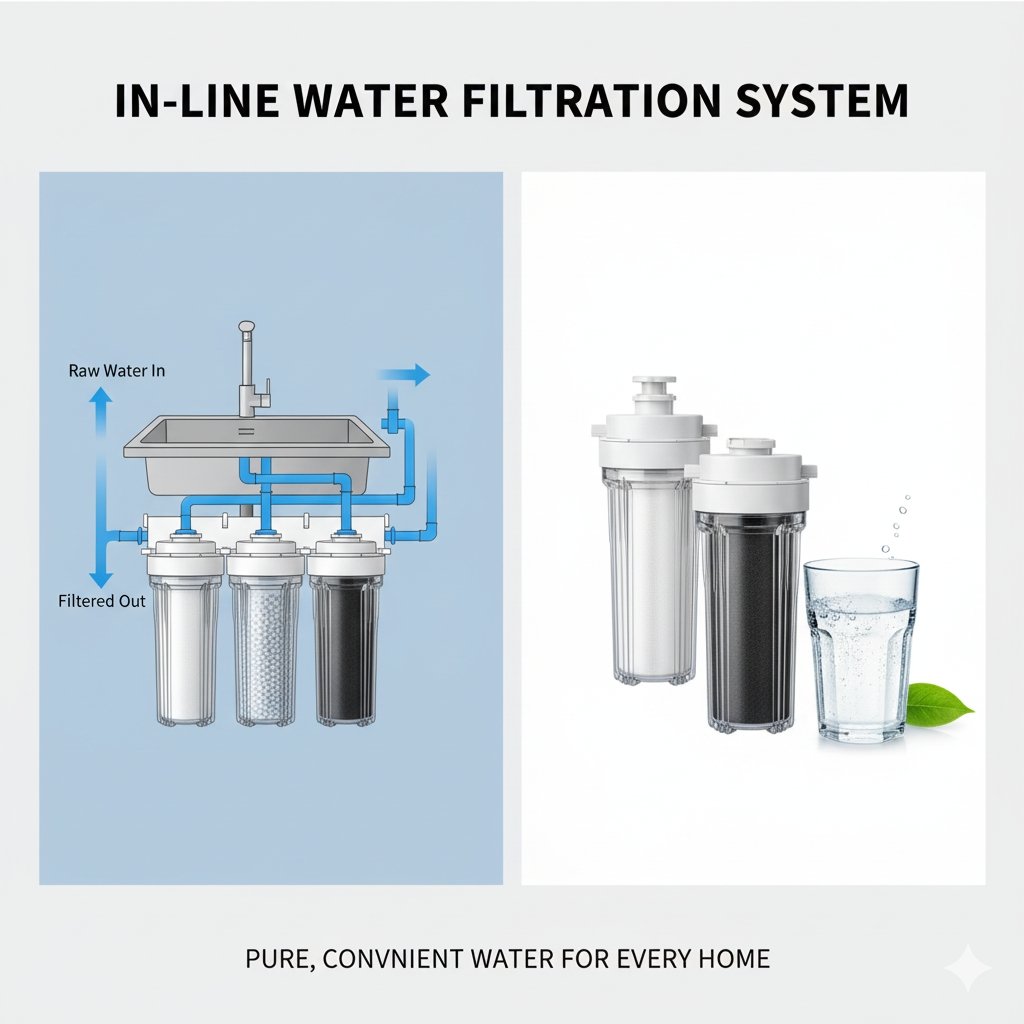
An in-line water filtration system (often written “inline”) is a compact filter module installed directly into the supply line that feeds a single appliance or tap. Instead of treating all the water entering a home, in-line filters target a single point of use—typically a refrigerator, ice maker, coffee or espresso machine, water dispenser, or a dedicated chilled-water faucet. They are valued for their low footprint, low installation impact, and focused performance.
Why homeowners choose in-line filtration
- Space constraints: No bulky housings or under-sink boxes—modules tuck into tight cavities behind appliances.
- Cost-effectiveness: Lower upfront cost than multi-stage under-sink systems for single-tap needs.
- Appliance protection: Prevents sediment and chlorine from degrading solenoids, valves, and boilers.
- Targeted quality: Polishes water for the uses that matter most—drinks, ice, and food prep—without treating the entire house.
- Quick DIY installs: Push-fit or quick-connect fittings make many in-line systems DIY-friendly.
What in-line systems can and cannot do
Do:
- Remove visible sediment and particulate (with the right micron rating).
- Remove chlorine taste and odor and many organics when equipped with activated carbon.
- Protect appliance components and improve ice/coffee taste.
- Provide point-of-use polishing when paired with upstream pre-filtration.
Do not:
- Replace whole-house treatment—scale, hardness, or shower water quality remain unaffected.
- Eliminate dissolved salts (TDS) effectively unless a specialized membrane module is used (rare inline RO).
- Guarantee removal of all health-related contaminants (lead, PFAS) unless specifically designed, tested, and certified for those contaminants.
Core technologies and filter media
Understanding media options helps you match solutions to problems.
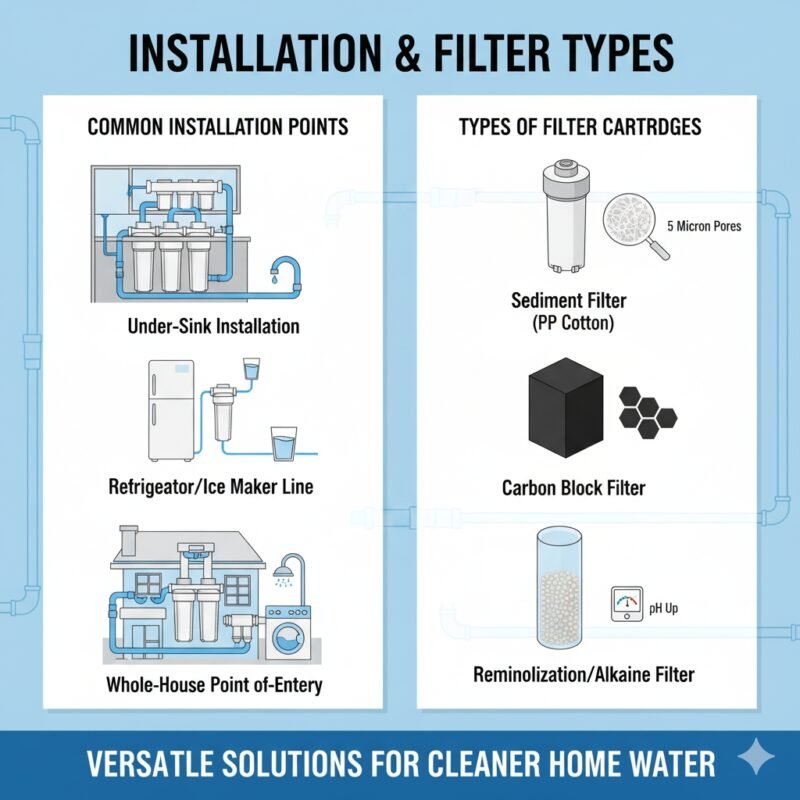
Sediment media (PP depth filters)
- Purpose: Trap sand, rust, silt, and coarse particulates.
- Formats: Melt-blown polypropylene (PP) depth cartridges, pleated elements.
- Micron ratings: 1–20 µm are common; 1–5 µm protects sensitive equipment or downstream membranes, 10–20 µm is used for visible sediment.
- Best practice: Always place sediment upstream of carbon or membranes to preserve media life.
Activated carbon (GAC and carbon block)
- Purpose: Adsorb chlorine, many VOCs, and taste/odor compounds.
- GAC (granular activated carbon): Lower pressure drop, good for higher flow.
- Carbon block: Denser and more efficient by volume, also provides particulate capture.
- Carbon considerations: New carbon often needs flushing to remove fines and bed dust.
Catalytic carbon and KDF
- Catalytic carbon: Engineered to break down chloramines (a more stable disinfectant used by some utilities). Requires more contact time than standard carbon.
- KDF (copper-zinc alloy): Works in tandem with carbon to reduce some metals and inhibit biological growth; often used where iron or hydrogen sulfide are concerns.
Membrane technologies (UF / mini-RO)
- Ultrafiltration (UF): Removes bacteria and cysts, pore sizes ~0.01–0.1 µm. Useful if microbial reduction is needed at the point of use.
- Small RO or micro-RO inline modules: Rare for inline use because RO requires pressure and creates reject water; typically better as under-sink systems with tanks.
Specialty adsorbents
- Designed for PFAS, specific VOCs, or unusual contaminants. Require vendor data and independent lab validation. Often implemented only when a lab test identifies the contaminant.
Common in-line configurations and where they belong
Sealed disposable capsules
- Small and fully enclosed; replace entire module when spent.
- Best for fridges, ice makers, and quick retrofits.
- Pros: Simplicity and compactness.
- Cons: More frequent disposal and limited capacity.
Inline canisters with replaceable cartridges
- Larger housings that accept replaceable media elements.
- Best for espresso machines or dispensers that require longer life between changes.
- Pros: Lower ongoing waste and higher capacity.
- Cons: Slightly larger footprint and more parts to maintain.
Dual-stage inline modules
- Combine sediment + carbon in a single inline unit for compact pre- and post-treatment.
- Best when both particulate and chlorine taste are concerns in the same tight space.
UF inline modules
- Provide a microbiological barrier in compact form for point-of-use scenarios where bacteria are a risk.
How to select the right in-line system (step-by-step)
- Diagnose the problem
The single best investment is a basic water test or review of your municipal water quality report. Identify whether your priority is chlorine taste, chloramine, sediment, iron, hardness, PFAS, or microbes. Media choice depends entirely on the problem. - Map the appliance flow profile
Different appliances draw water differently. Refrigerators draw small continuous flows; espresso machines require short bursts of high-volume water. Choose modules rated for the peak and pulse flows encountered in the appliance. - Choose the media and micron rating
- Chlorine/taste only → carbon block or GAC.
- Sediment protection ahead of equipment → PP 5–10 µm typical; 1–3 µm for high-sensitivity appliances.
- Chloramine → catalytic carbon with adequate contact time.
- Microbiological risk → UF or UV (UV usually installed separately).
- PFAS/target contaminants → specialty adsorbents with lab data.
- Verify pressure and materials compatibility
Confirm the module’s maximum operating pressure and temperature. Match tubing size (1/4″, 3/8″, etc.) and connection types (push-fit, barb, threaded). Confirm all wetted materials are rated for potable water contact. - Check rated life and replacement cost
Manufacturers provide rated gallons or months. Estimate daily consumption and determine replacement cadence. Include replacement cost in your operating budget. - Demand certifications and lab data when needed
For health-related contaminant claims (lead, PFAS), require NSF/ANSI certifications or independent lab results that list influent concentrations and percent removal at the specified flow. For taste/odor claims, NSF/ANSI 42 is relevant.
Practical installation steps
Most in-line installs are simple, but follow these best practices:
Tools: tubing cutter, screwdriver or wrench for fittings, mounting bracket or zip ties, towel for drips.
- Shut off the water supply to the appliance and relieve pressure (open a downstream faucet).
- Choose a location with service access for cartridge changes—avoid stuffing the filter behind the fridge where you can’t reach it.
- Cut the tubing squarely using a cutter—clean cuts prevent leaks.
- Insert tubing fully into push-fit fittings or secure onto barbed fittings with clamps. Observe flow direction markings on the cartridge.
- Mount the cartridge to a bracket or secure to a sturdy surface—do not let tubing weight stress fittings.
- Turn water on slowly, check for leaks, then flush the cartridge per instructions to remove manufacturing fines (carbon filters typically need significant flushing).
- Record installation date and set a reminder for replacement.
Safety and code notes
- Some local plumbing codes require accessible shutoffs or restrict certain installations—check local requirements.
- If microbial risk exists, consider adding a UV stage or using UF modules and maintain regular sanitation.
- Avoid cross-connections and follow manufacturer instructions carefully.
Maintenance and replacement guidance
- Replace sediment cartridges when flow drops or every 3–12 months depending on turbidity and micron rating.
- Replace carbon modules every 6–12 months or per gallon rating; higher chlorine loads shorten life.
- If you experience taste or odor return, replace carbon immediately—don’t wait for the calendar.
- Flush new cartridges thoroughly to remove fines—insufficient flushing is the most common cause of post-install taste complaints.
- Keep spare cartridges and a replacement log to avoid operating unfiltered.
Troubleshooting—fast fixes for common problems
Low flow after installation
- Check for kinks or pinched tubing.
- Replace or inspect the sediment element—clogged media reduces flow.
- Verify the cartridge was installed in the correct orientation.
Persistent off-taste or odor
- Ensure the carbon was flushed sufficiently.
- Replace the carbon element; sometimes low-quality carbon has a persistent taste and needs a higher-grade block carbon.
- Check for upstream contamination or a water heater backflow (rare).
Leaks at fittings
- Push-fit connections must be fully seated—push until you feel a click.
- Replace worn tubing or clamps for barbed fittings.
- Replace cracked housings—do not operate a cracked cartridge.
Air in lines or sputtering
- Purge by opening the dispenser for several minutes; ensure tubing connections are tight.
Cost expectations and total cost of ownership
Upfront costs
- Small disposable inline capsules: $10–$50 per module.
- Inline canister housings with replaceable elements: $30–$150 for housing + first cartridge.
- Installation: DIY often free; professional assistance $50–$200 depending on complexity.
Operating costs
- Annual replacement per inline point: $20–$200 depending on cartridge size and usage.
- Factor in the cost savings from avoided appliance repairs (replacing solenoids, ice maker components) and the value of improved beverage quality.
Environmental tradeoffs and sustainable choices
- Single-use sealed capsules produce more waste. Prefer replaceable cartridges with durable housings to minimize plastic waste.
- Buy larger-capacity cartridges where usage supports longer intervals between replacements—greater mass of adsorbent reduces per-liter waste.
- Look for vendors offering recycling or take-back programs for used cartridges.
- Consider coconut-shell carbon or suppliers with explicit sustainability practices where appropriate.
Certifications and testing to trust
- NSF/ANSI 42 — aesthetic effects (chlorine, taste/odor).
- NSF/ANSI 53 — health effects (lead, cyst reduction, some VOCs).
- NSF/ANSI 401 — emerging contaminants (some pharmaceuticals).
- WQA Gold Seal — independent verification in some cases.
When a vendor claims contaminant removal beyond basic taste/odor, insist on lab test reports that specify challenge concentration, flow rate, and percent reduction. For PFAS and other emerging contaminants, validate the exact species tested—ROIs matter (some PFAS species are harder to remove than others).
How in-line filters fit into a layered home water strategy
One of the most effective approaches is layering:
- Point-of-entry (whole-house) sediment and carbon protects piping and reduces chlorine exposure across the home. Example whole-house systems provide robust pre-filtration for all inline modules and appliances: https://yourwatergood.com/product/whole-house-water-filtration-system-for-home/.
- Inline point-of-use modules polish water for a fridge, ice maker, or coffee maker.
- Under-sink RO can serve as the primary low-TDS drinking-water solution where needed.
Layering reduces replacement frequency of small inline cartridges and extends the life of more expensive media like membranes.
Choosing a vendor and evaluating product claims
Ask vendors for:
- Flow vs pressure-drop curves at relevant flows.
- Gallon ratings for chlorine capacity or contaminant-specific capacity.
- Independent lab data for health-related claims.
- Clear installation and flushing instructions.
- Warranty and replacement part availability.
Avoid marketing claims without test data. Verified third-party certificates and transparent bench reports are the best defense against overpromised performance.
Common use-case examples
Refrigerator/ice-maker inline module
- Typical module: carbon block inline capsule with a 6–12 month rated life.
- Benefit: clearer, better-tasting ice and reduced appliance maintenance.
Espresso machine inline pre-filter
- Typical setup: 5 µm sediment inline before a carbon canister to ensure taste and protect boilers.
- Benefit: better espresso flavor, less scale buildup in boilers (when combined with softening or other anti-scale measures if hardness is an issue).
Home bar drinks station
- Larger inline canister with replaceable carbon block for high throughput and entertaining use—longer life and easier servicing.
Final decision checklist
- Get a water test or review municipal data.
- Confirm the appliance flow profile and tubing size.
- Choose the right media: sediment first, carbon for taste, catalytic for chloramine, UF for microbes.
- Check manufacturer flow/ΔP data and rated gallons.
- Verify materials and certifications for health claims.
- Confirm installation location is accessible for service.
- Budget replacement cartridges and keep spares.
- Consider pairing with a whole-house point-of-entry system for upstream protection.
- Prefer replaceable-cartridge housings for sustainability when possible.
- Keep the vendor’s test reports, installation guide, and warranty info on file.
Conclusion
In-line water filtration systems are a smart, low-impact way to deliver clean, great-tasting water exactly where you need it. They protect appliances, improve beverages and ice, and are often the simplest route to dramatically better point-of-use water quality. The keys to success are diagnosing the real water problem, matching the media to that problem, sizing the module for the appliance draw, verifying performance with test data or certifications, flushing and maintaining the module properly, and integrating inline units into a layered home-water strategy if you require broader protection. For households that want a full-house baseline plus focused point-of-use polishing, combining an upstream whole-house system with selective inline modules creates a durable, low-maintenance solution—see one example of a whole-house option here: https://yourwatergood.com/product/whole-house-water-filtration-system-for-home/.