
Ro System In Kitchen — The Complete buyer’s guide, installation plan, and maintenance roadmap
If you’re thinking about an ro system in kitchen, you probably want clearer answers than product pages and checkout buttons provide: what exactly does a kitchen RO do, how it fits into your plumbing and daily routine, how to choose the right capacity and features, what ongoing maintenance looks like, and how to avoid the common mistakes that turn a great system into a hassle. This guide walks you through everything a thoughtful homeowner or renter needs to know — from simple definitions to practical installation steps, cost expectations, water-quality checks, troubleshooting, and a purchase checklist you can use the next time you search for models and supplies (start your product comparison at https://yourwatergood.com/ and shop filters and accessories at https://yourwatergood.com/shop/).
Read straight through or jump to the section you need — by the end you’ll know whether an ro system in kitchen is the right investment for your household and exactly how to manage it.
Quick summary (one sentence)
An ro system in kitchen is a point-of-use reverse osmosis drinking-water system installed at the kitchen sink that uses staged filtration (sediment → carbon → RO membrane → post-filter) to deliver low-TDS, great-tasting water for drinking and cooking; it requires prefiltration, periodic maintenance, and decisions about capacity and efficiency.
1. What exactly is an “ro system in kitchen”?
An ro system in kitchen is a compact water purification assembly typically mounted under the kitchen sink (or in a nearby cabinet) that treats water at the point where you need it most — for drinking, cooking, and beverage preparation. These systems are designed to:
- Remove dissolved solids (TDS), heavy metals (lead, arsenic), fluoride, nitrates, and many organic contaminants.
- Improve taste and odor by removing chlorine and organics (with carbon stages).
- Provide on-demand, chilled or room-temperature filtered water through a dedicated faucet or integrated tap.
Unlike whole-house systems that treat every drop entering the home, an ro system in kitchen focuses on the one place where the highest water quality matters: the kitchen tap.
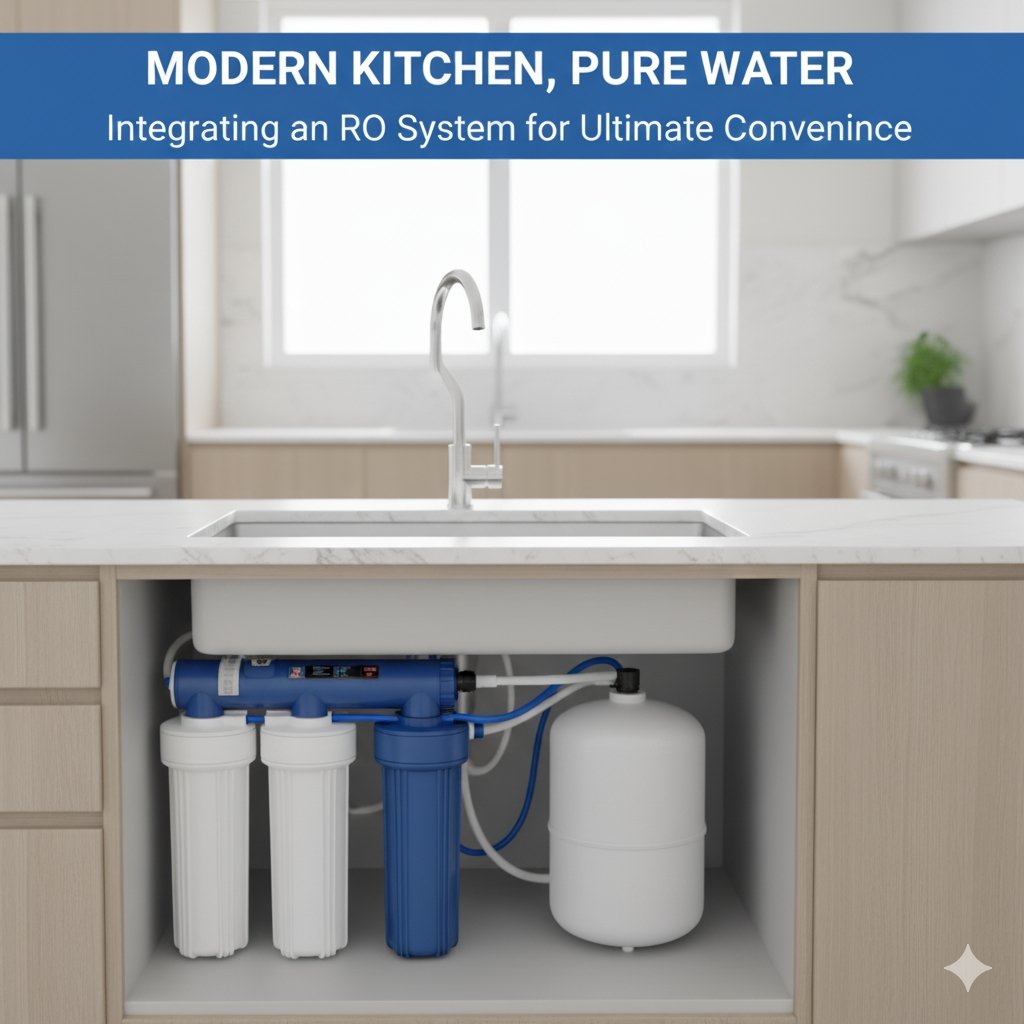
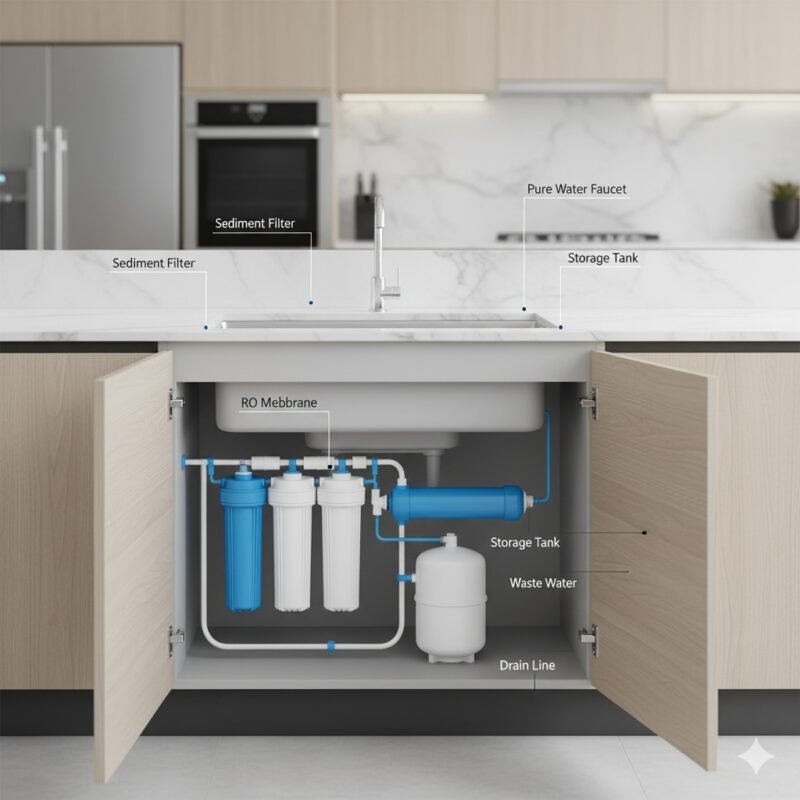
2. Typical components of a kitchen RO system
A standard ro system in kitchen includes several stages and parts. Understanding them helps when comparing models or talking to installers.
- Sediment prefilter (PP) — captures sand, silt, rust, and larger particles to protect downstream components.
- Carbon prefilter — removes chlorine and organic compounds that can damage the RO membrane and cause off-taste.
- Reverse osmosis membrane — the heart of the system: a semi-permeable membrane that rejects dissolved ions and many contaminants.
- Storage tank — pressurized tank that holds purified water so you have immediate flow at the faucet.
- Post-carbon (polishing) filter — final taste polish before water reaches the faucet.
- Dedicated faucet / dispenser — often a small chrome or brushed stainless mini-faucet mounted on the sink or countertop.
- Drain saddle & tubing — for discharge of the reject (waste) stream.
- Optional items: permeate pump (increases efficiency), remineralizer (adds back minerals for taste), UV sterilizer (for microbial risk), booster pump (if household pressure is low).
Each component has a role and replacement interval; the most common user tasks are replacing the prefilters and post-filters and eventually replacing the membrane.
3. How an RO system in kitchen works (in plain English)
The process is staged so each element protects the next and improves overall performance:
- Step 1 — Pre-filtration: Incoming cold water flows through the sediment and carbon prefilters. Sediment traps particles; carbon removes chlorine and organic compounds that would otherwise shorten membrane life.
- Step 2 — Reverse osmosis membrane: Pressurized feed water is pushed across the RO membrane. Pure water molecules pass through to the permeate side (product water); dissolved ions and larger molecules are rejected and concentrated into the reject stream.
- Step 3 — Storage: Product water goes into the pressurized storage tank. Because membranes produce water slowly (relative to a faucet), the tank ensures you have usable volume on demand.
- Step 4 — Polishing & delivery: When you open the dedicated faucet, product water is pushed through a post-carbon polishing filter for taste and then dispensed. The system refills the tank automatically until it reaches preset pressure.
- Step 5 — Waste management: The reject water carries contaminants to the drain. Modern systems aim to reduce waste with better membranes, permeate pumps, or higher recovery ratios.
This staged architecture is why an ro system in kitchen is effective: each stage solves a specific problem and preserves the membrane’s life and performance.
4. Benefits of having an ro system in kitchen
Why choose a kitchen RO over other filter types? Here’s the practical upside:
- Superior removal of dissolved contaminants — RO removes contaminants many carbon filters cannot (e.g., fluoride, dissolved salts, many heavy metals).
- High-quality drinking and cooking water — improved taste, clarity, and performance in hot drinks and cooking.
- Compact & targeted — treats only the drinking water source, so it’s cost-effective compared to whole-house RO.
- Protects vulnerable populations — for households with infants or immune-compromised members, RO can reduce specific risks when paired with the right pre- and post-stages.
- Convenience — dedicated faucet and ample storage tank mean immediate access to purified water without pitcher refills.
- Lower tap-to-tank plumbing complexity — most installs fit into standard under-sink space without major plumbing changes.
These advantages explain why the ro system in kitchen is one of the most popular point-of-use options for homeowners.
5. Limitations and trade-offs you must consider
An honest evaluation includes the downsides:
- Water waste (reject) — RO creates a concentrate stream. Older basic units may waste 3–4 gallons per gallon produced. Modern high-efficiency systems, permeate pumps, and booster pumps can cut that dramatically (approaching 1:1 in the best systems).
- Mineral removal — RO strips beneficial minerals; some users prefer remineralizers for taste and mouthfeel.
- Maintenance requirement — prefilters and post-filters typically need replacement every 6–12 months; membranes every 2–5 years depending on feed water.
- Limited flow — RO systems dispense via a storage tank; flow at the dedicated faucet is limited by tank pressure. For larger water dispensing needs, consider capacity choices.
- Not a whole-house fix — RO won’t help with shower quality, laundry, or appliances unless you choose a whole-house approach for those issues.
If you accept these trade-offs, an ro system in kitchen delivers highly pure drinking water with predictable maintenance and strong contaminant removal.
6. Who should install an RO system in kitchen?
An ro system in kitchen is appropriate if any of the following apply:
- Your water test shows elevated TDS, fluoride, lead, nitrates, or PFAS at the kitchen tap.
- You want top-tier drinking water quality for cooking, coffee, or baby formula.
- You prefer a point-of-use solution that avoids the high cost and water waste of whole-house RO.
- You’re renovating a kitchen and can easily accommodate under-sink equipment.
- You have access to replacement parts and are willing to follow a maintenance schedule.
If your main concern is softened water for bathing or scaling, install a whole-house softener instead and consider RO only for drinking water.
7. How to choose the right ro system in kitchen — a step-by-step checklist
- Test your water. A basic lab panel (TDS, lead, fluoride, nitrates, pH, iron) gives you the facts to pick the right RO. Municipal users should check the Consumer Confidence Report (CCR).
- Decide required contaminant removal. If you need lead or fluoride reduction, ensure the RO model/membrane and pre/post stages are appropriate and certified.
- Choose capacity. Typical household RO membranes are 50–75 gallons per day (GPD). For a family of 4, 50–75 GPD with a 4-gallon tank usually suffices. For larger families, pick bigger membranes or dual systems.
- Check efficiency. Look for systems with permeate pumps or high-recovery membranes if water waste matters in your region.
- Consider extra features: remineralizer, permeate pump, UV sterilizer (if feed water may have microbes), leak-detector shutoff.
- Review certifications. NSF/ANSI 58 for RO systems, NSF/ANSI 42/53 for filter stages where relevant.
- Assess replacement costs. Compare annual filter costs and membrane prices (TCO matters).
- Decide installation mode. DIY-friendly quick-connect systems vs professional install that preserves warranties and code compliance.
- Check spare-part availability. Make sure replacement filters and membranes are easy to order — use sites like https://yourwatergood.com/shop/ to verify.
- Read reviews & support policies. Prefer manufacturers with clear manuals and local support.
Follow this checklist to avoid the two most common buyer regrets: underspecifying capacity and underestimating ongoing filter costs.
8. Installation: what to expect (DIY vs professional)
Installing an ro system in kitchen is commonly done by DIYers but there are reasons to consider professional installation:
DIY install (common for simple systems):
- Tools needed: adjustable wrench, tube cutter (for clean cuts on plastic tubing), Teflon tape, and sometimes a drill for the faucet hole.
- Typical steps: shut off cold water supply, install feed valve, mount filter housings, install RO membrane housing, connect tank, mount faucet (or use existing soap-hole), saddle drain for reject, flush and test.
- Time: 1–3 hours for competent DIYers.
- Pros: lower labor cost.
- Cons: risk of leaks, improper drain saddle placement, accidental voiding of warranty if manufacturer requires professional installation.
Professional install:
- Pros: ensures code compliance, leak-proof connections, correct tank pressurization, and proper drain installation. Many installers include a basic post-install test and initial filter replacements in a service package.
- Cost: $100–$300 depending on local labor rates and complexity.
- When recommended: if you’re not comfortable with plumbing, if the install requires drilling a faucet hole, or if you need a booster pump or electrical hookup for UV or booster.
Whichever route you choose, follow the manufacturer’s start-up flush procedures to avoid carbon fines in new filters and always test water after installation to verify performance.
9. Maintenance schedule — keep your ro system in kitchen healthy
A standard maintenance schedule for an ro system in kitchen:
- Every 6–12 months: Replace sediment and carbon prefilters and post-filter. Frequency depends on feed water quality and manufacturer guidance.
- Every 2–5 years: Replace the RO membrane. Monitor product TDS — if it drifts up significantly, it’s time for membrane replacement.
- Annually: Sanitize and clean the storage tank; check fittings and tubing for wear.
- As needed: Replace permeate pump components, check valve function, and replace the remineralizer (if used).
- Continuous: Monitor product water quality with a TDS meter and log replacement dates.
A disciplined maintenance routine prevents bacterial growth in stagnant systems and preserves membrane life. Many vendors offer subscription filter delivery to simplify care — check consumables availability at https://yourwatergood.com/shop/.
10. Costs: upfront, replacement, and total ownership
Understanding cost helps set realistic expectations for an ro system in kitchen.
Upfront costs
- Basic 3–4 stage under-sink RO unit: $200–$400.
- Mid-range with remineralizer and permeate pump: $400–$800.
- Premium units with UV and smart monitoring: $800–$1,500+.
- Installation (professional): $100–$300.
Replacement & annual costs
- Prefilters & post-filters: $30–$150/year.
- RO membrane: $50–$200 every 2–5 years depending on use and membrane quality.
- Optional UV lamp: $50–$150/year.
Total cost of ownership (5 years)
For a typical mid-range system: Upfront $600 + annual $120 × 5 = $1,200 total. Variability depends heavily on water quality and usage.
When comparing models, calculate 5-year costs including membrane replacement to avoid surprises.
11. Efficiency & environmental considerations
Water stewardship matters. If you’re thinking about an ro system in kitchen, consider:
- Recovery ratio — the fraction of feed water converted to product water. Look for high-recovery designs or permeate pumps to reduce waste.
- Reuse of reject water — collect reject stream for toilet flushing, laundry, or irrigation when safe and permissible (local codes vary). This can dramatically lower net water footprint.
- High-efficiency membranes & pumps — newer membranes and accessories improve recovery.
- Energy use — booster pumps or UV lamps consume electricity; assess lifecycle energy costs if sustainability is a priority.
Balancing purified water needs with water conservation is part of modern responsible ownership.
12. Troubleshooting common problems
Low flow from faucet
- Likely causes: tank pressure low, clogged prefilter, or a blocked post-filter. Check tank pre-charge and replace prefilters if overdue.
High TDS in product water
- Causes: membrane failure, overdue replacement, or a bypassed membrane. Test feed vs product TDS; replace membrane if product TDS close to feed TDS.
Strange tastes/odors
- Causes: new carbon filter not flushed, old post-filter exhausted, or tank sanitization overdue. Flush new filters; replace post-filter.
Leaking
- Causes: loose fittings, cut tubing, worn O-ring. Tighten fittings, reseat tubing, and replace damaged O-rings.
Keep spare O-rings, a wrench, and a small parts kit; they save service calls.
13. Safety and certification — what to look for
- NSF/ANSI 58 — certification specifically for reverse osmosis systems. It validates reduction claims and structural safety.
- NSF/ANSI 42 & 53 — certifications for carbon and health-related contaminant reduction in pre/post stages.
- Material safety — ensure housings and fittings are food-grade (BPA-free plastics where applicable).
- Manufacturer documentation — clear manuals, replacement part numbers, and performance data for the membrane and filter stages.
Choosing certified products gives you measurable assurance of the ro system in kitchen performance.
14. Upgrades and add-ons worth considering
- Permeate pump — increases efficiency and reduces wastewater. Recommended if water waste is a concern.
- Remineralizer / alkaline cartridge — restores minerals for taste and slightly higher pH. Good for those who dislike flat-tasting RO water.
- UV sterilizer — adds microbial protection when feed water is suspect (wells, occasional contamination).
- Smart monitoring — TDS meters, leak detectors, or app-based monitoring for filter life and leak detection.
- Inline booster pump — necessary if home water pressure is low (<40 psi).
Pick add-ons that address your specific pain points (efficiency, taste, safety) rather than buying every feature.
15. Buying and installation checklist — final practical steps
- Get a water test (TDS, lead, fluoride, nitrates).
- Determine daily household water needs and pick an RO capacity (50–75 GPD typical).
- Choose a certified model (NSF/ANSI 58) and verify replacement filter availability at stores like https://yourwatergood.com/shop/.
- Decide DIY or professional install; if hiring, get at least 2 quotes and inspect references.
- Plan a space for the storage tank and tubing runs; choose faucet mounting location.
- Buy spare filters and a TDS meter; set calendar reminders for replacements.
- After install, run initial flush per instructions and test product water to confirm performance.
This checklist streamlines the path from purchase to reliable operation.
16. Frequently asked questions (brief)
Q: Will an RO system remove bacteria?
A: Not reliably on its own. Use a UV stage for microbial disinfection if your feed water may contain bacteria.
Q: Can I install RO without a dedicated faucet?
A: You can retrofit some systems to existing soap-dispensing holes, but a dedicated faucet is best for convenience.
Q: How long does an RO membrane last?
A: Typically 2–5 years depending on feed water quality and prefilter maintenance.
Q: Is RO water healthy?
A: RO water is safe. It is low in minerals; many people remineralize for taste, but dietary minerals usually cover nutritional needs.
17. Conclusion — is an ro system in kitchen right for you?
An ro system in kitchen is a pragmatic, high-impact investment for homeowners who prioritize drinking-water quality, have specific dissolved contaminants to remove, or simply want consistently great-tasting water for cooking and beverages. It balances performance and cost: much cheaper and more water-efficient than whole-house RO but far more capable than a simple carbon pitcher.
If your water test shows dissolved contaminants (high TDS, lead, fluoride, PFAS), or if you want the peace of mind of near-drinking-water purity, a well-chosen and properly maintained ro system in kitchen delivers exceptional value. Start your model and parts comparison at https://yourwatergood.com/ and verify filter and membrane availability at https://yourwatergood.com/shop/ before purchase.