
How To Select Water Filter For Home: A Practical, Evidence-Based Roadmap To Pick The Right System
When you search for how to select water filter for home, you’re really asking three connected questions: (1) what contaminants are in your water, (2) which technologies reliably remove those contaminants, and (3) which balance of cost, maintenance, and convenience suits your household? This article gives you a step-by-step, practical plan to answer those questions for your house — not for a generic “average” home. It walks through testing, technology choices, system placement (point-of-use vs point-of-entry), certifications to demand, installation and maintenance realities, environmental trade-offs, and a final buying checklist so you can purchase with confidence. Wherever appropriate, I point out decision tradeoffs and common mistakes to avoid. You’ll also find clear recommendations for typical scenarios and a short FAQ to settle recurring doubts. Before you buy, visit product pages like https://yourwatergood.com/ to compare technical specs and third-party documentation for any model you shortlist.
Introduction: why a one-size answer doesn’t work
Choosing a water filter isn’t like picking a single “best” model off a shelf; it’s a diagnostic decision. Two homes on the same street can require very different systems: one might only need a carbon filter to remove chlorine taste, while the other needs a multi-stage reverse osmosis system to handle high TDS, lead, or fluoride. The single most important rule in how to select water filter for home is: test your water first. Without a water test you’ll be guessing at which contaminants matter, wasting money on features you don’t need or missing dangers you do. This guide begins with testing and then leads you through the entire selection process so the final choice matches your water profile, family needs, budget, and maintenance preferences.
Step 1 — Test your water: knowledge is the foundation
Testing your water is inexpensive compared to installing the wrong system. There are three reliable ways to learn what’s in your water:
- Municipal customers: download the most recent Consumer Confidence Report (CCR) from your water supplier. It lists regulated contaminants, common treatment chemicals (like chlorine), and measured concentrations. The CCR is a baseline but doesn’t measure everything (for example, not all emerging contaminants or localized plumbing lead sources).
- Private well owners: use a certified laboratory to run a full panel. Essential tests include bacteria (coliform/E. coli), nitrates/nitrites, arsenic, lead, pH, hardness, total dissolved solids (TDS), and pesticides if relevant. If you suspect industrial contamination, test for VOCs and specific regionally relevant compounds.
- Home test kits: useful for rapid checks (hardness strips, chlorine, basic lead screen), but not a replacement for lab testing when health-relevant contaminants might be present.
What to note on your report: highlight the contaminants that violate recommended limits (or are present at noticeable concentrations), record TDS, hardness (mg/L or grains/gallon), pH, and any episodic issues (seasonal taste, turbidity after storms). Once you have this data, you can map contaminants to treatment technologies.
Step 2 — Map contaminants to technologies (the essential cheat sheet)
After testing, use this practical mapping to determine which technologies remove which contaminants:
- Sediment, rust, sand: sediment filters (spun, pleated, cartridge), whole-house sediment housings.
- Chlorine, taste/odor, many VOCs: activated carbon (GAC or carbon block).
- Lead, arsenic, fluoride, nitrate: reverse osmosis (RO), certain ion-exchange resins, or certified adsorptive media.
- Bacteria and viruses: UV disinfection, chlorination, or ultrafiltration (depending on pore size); prefiltration is required for UV effectiveness.
- Cysts (Giardia, Cryptosporidium): micro/ultrafiltration and sediment removal.
- Hardness (calcium, magnesium): ion-exchange softeners (salt or potassium), or salt-free scale control technologies.
- PFAS (per- and polyfluoroalkyl substances): high-quality GAC (specific PFAS media) and RO can reduce PFAS — check vendor lab data.
- High TDS / multiple dissolved minerals: RO is the most effective POU solution.
Use the mapping to eliminate whole classes of systems that cannot solve your problem: for example, carbon cannot reliably remove dissolved salts or many heavy metals, so it’s the wrong choice if TDS or dissolved lead are the issue.
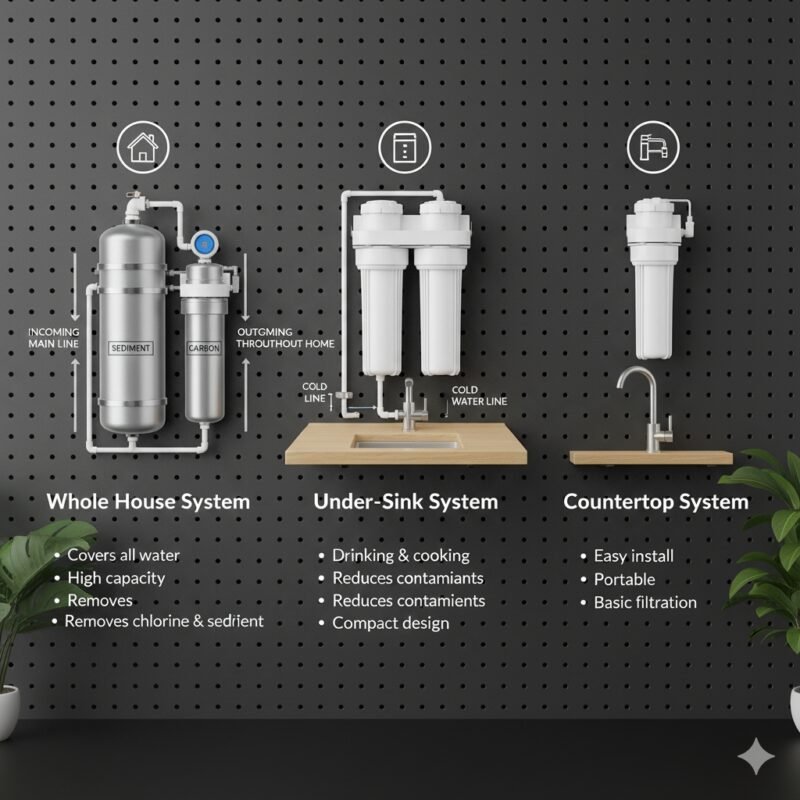
Step 3 — Decide where to treat water: POU vs POE (point-of-use vs point-of-entry)
Your needs determine whether you should treat water only where you drink and cook (point-of-use, POU) or treat all water entering the home (point-of-entry, POE).
- POU (under-sink, countertop, faucet-mount): ideal for drinking and cooking. It’s cost-efficient when you only need high-quality water at a single tap. POU systems include RO, under-sink carbon, and compact UF filters.
- POE / Whole-house: installed at the main line to treat water for showers, faucets, laundry, and appliances. Best when you need sediment removal, chlorine reduction (to protect skin and laundry), or scale control. Whole-house RO is rarely used because of cost and reject water concerns.
A common optimum: POE sediment and carbon + POU RO or POU carbon. The whole-house components protect plumbing and appliances, while the POU system ensures drinking water quality.
Step 4 — Understand the major technologies in detail (pros, cons, and use cases)
Activated Carbon (GAC / carbon block)
Pros: affordable, improves taste, removes chlorine and many VOCs; available in many formats (pitcher, faucet, under-sink, whole-house vessels).
Cons: not effective for dissolved salts (TDS), many heavy metals, fluoride, or microbes unless specifically certified for those contaminants. Carbon life shortens with high chlorine or VOC loads.
Reverse Osmosis (RO)
Pros: strong removal for dissolved inorganic contaminants (lead, arsenic, fluoride, nitrates), many organics, and reduces TDS; best POU technology for “comprehensive” drinking water purification.
Cons: wastes some water (variable ratios), removes minerals (remineralization blocks are available), has lower flow without a storage tank, requires prefiltration and periodic membrane replacement.
Ultrafiltration / Microfiltration
Pros: effective for suspended solids, cysts, and some bacteria depending on pore size; can be gravity-fed in some designs.
Cons: not for dissolved salts or most organics.
UV Disinfection
Pros: chemical-free inactivation of bacteria, viruses, and protozoa; excellent for well water microbial issues.
Cons: no chemical removal; requires clear water and power; lamp output decays and requires annual replacement.
Ion Exchange / Water Softeners
Pros: effective at removing hardness ions (calcium, magnesium); improves appliance life and reduces scale.
Cons: adds sodium (unless potassium used), not for organics or microbes, environmental impacts where brine discharge is regulated.
Specialized Adsorptive Media (PFAS, arsenic-specific media)
Pros: targeted removal when matched to the contaminant form.
Cons: require vendor lab data and sometimes frequent media replacement.
Ceramic Filters
Pros: durable, effective for particulates and some microbes; suitable for remote/off-grid uses.
Cons: slow flow and not effective for dissolved contaminants.
Step 5 — Certifications and proof: what to demand from manufacturers
You must demand third-party certifications and independent lab data. Certifications to look for include:
- NSF/ANSI 42 (aesthetic effects: chlorine, taste/odor)
- NSF/ANSI 53 (health effects: lead, cysts, VOCs)
- NSF/ANSI 58 (reverse osmosis systems)
- NSF/ANSI 61 (materials safety — no harmful leaching)
- NSF/ANSI 401 (emerging contaminants)
- WQA Gold Seal (Water Quality Association) for manufacturer quality processes
If a vendor claims PFAS removal or other specialty outcomes, request independent lab reports showing removal efficiency at concentrations close to your water report. Certifications are specific — a system certified for chlorine reduction may not be certified for lead removal. Match certificate scope to your needs.
Step 6 — Define performance metrics and practical constraints
When comparing systems, judge them by measurable performance and realistic household constraints:
- Contaminant removal claims backed by certification and test data.
- Flow rate and capacity: can the system meet peak demand (consider GPM for whole-house units and recovery/dispense rate for RO)?
- Replacement intervals and cost of consumables: cartridges, membranes, UV lamps.
- Ease of maintenance: tool-free cartridge swaps vs complex servicing.
- Installation complexity and whether a licensed plumber is required (especially for POE systems).
- Waste generation (RO reject water, filter cartridges) and environmental considerations.
- Warranty and company reputation for support and replacement parts.
Step 7 — Compare total cost of ownership (TCO), not just sticker price
Calculate five-year TCO: purchase + installation + replacement parts + energy + maintenance fees + disposal. A cheap upfront filter may have expensive cartridges that need replacing quarterly and thus become costly over time. RO systems tend to have higher upfront costs but are cost-effective over time if you need the contaminant removal they uniquely provide. Whole-house systems have large upfront costs but protect appliances and can save money on repairs and energy for hot water systems by avoiding scale.
Step 8 — Practical decision trees for common scenarios
Here are compact, real-world recommendations that answer the practical question of how to select water filter for home in everyday situations:
- City water with chlorine taste only: whole-house carbon or under-sink carbon + faucet filter. This protects showers and laundry and gives a better drinking water POU.
- Lead detected (older homes): certified POU filters (NSF/ANSI 53) or under-sink RO with lead removal certification. Use a dedicated drinking water tap.
- Well water with occasional bacteria: sediment prefilter → UV disinfection → optional carbon for taste/odor. Add monitoring and periodic well testing.
- High TDS or multiple dissolved contaminants: under-sink RO (with prefilters and remineralizer) for drinking water; whole-house sediment & carbon to protect plumbing.
- Hard water: ion-exchange softener at POE; consider POU RO for drinking water if other contaminants exist. Evaluate local regulations about salt discharge.
- PFAS concern: RO or PFAS-certified granular activated carbon targeted for PFAS; verify third-party testing.
Step 9 — Installation and maintenance realities you should plan for
Installation: whole-house systems typically require professional installers to meet plumbing codes and ensure correct pressure and flow. Many POU systems are DIY friendly, but mistakes on drain fittings (for RO) or improper pressure can reduce system life.
Maintenance: schedule replacements and lamp swaps proactively. A UV lamp’s visible glow doesn’t guarantee effective UV output; replace annually or per manufacturer instructions. Replace carbon cartridges and RO prefilters on schedule; membranes last longer but must be changed when TDS rejection declines. Track serial numbers, purchase dates, and set calendar reminders.
Step 10 — Environmental tradeoffs and mitigation
Every technology has tradeoffs: RO rejects water (modern high-efficiency systems can reach 1:1 to 2:1 ratios, older ones worse), softeners discharge salt, and disposable cartridges produce plastic waste. Reduce impact by: choosing high-efficiency RO, reusing RO reject water for toilets or laundry (where safe), selecting recyclable cartridge programs, and reviewing local regulations for water softeners. If sustainability is a priority, factor it into the TCO and decision process.
Step 11 — Common mistakes to avoid when selecting a system
- Buying without test data.
- Equating price with effectiveness.
- Ignoring certification scopes (a system may be certified for chlorine but not for lead).
- Underestimating maintenance cost and frequency.
- Installing whole-house RO when a POU RO plus whole-house sediment/carbon is a better choice.
- Failing to retest water after installation to confirm performance.
Step 12 — How to evaluate vendors and installers
Ask vendors these three questions and demand proof:
- Can you provide NSF/ANSI certificates for the specific model and serial number?
- Do you have independent third-party lab reports showing performance on contaminants relevant to my water report?
- What is the exact replacement schedule and cost for all consumables?
For installers, verify licensing, insurance, and references. For whole-house systems, confirm they size equipment to peak demand and pressure requirements.
Step 13 — A compact consumer checklist you can use at the store or online before purchase
- I have a current water test or CCR.
- I have identified the top 2–3 contaminants of concern.
- The system I’m considering is certified for those contaminants.
- I understand installation requirements and whether a pro is needed.
- I have calculated five-year TCO including consumables.
- I know how to perform or schedule maintenance.
- I will retest water post-installation to verify claims.
Step 14 — Typical system combinations that work well together
- Whole-house sediment + whole-house carbon + under-sink RO: protective POE treatment for appliances and targeted drinking water treatment at POU.
- Sediment + UV + under-sink carbon: excellent for wells where bacteria and taste/odor are issues.
- Softener (POE) + POU RO: solves hardness and provides pure drinking water.
Step 15 — Frequently asked questions (short answers)
Q: Do I need RO if my water tastes fine?
A: Not necessarily. If lab tests show no health-relevant dissolved contaminants, a carbon filter for taste may be enough. Use RO when TDS, heavy metals, fluoride, or specific contaminants require it.
Q: How often should I test water?
A: Municipal users should review CCR annually. Well owners should test at least yearly for bacteria and nitrates and after events like flooding. Test again after installation to validate system performance.
Q: Can one filter remove everything?
A: No: most effective systems are multi-stage. RO with prefiltration and post-polishing plus POE protection is the common “comprehensive” approach.
Q: Are countertop pitchers useful?
A: They’re affordable and improve taste but have limited capacity and do not replace certified POU systems for serious contamination.
Conclusion: your decision roadmap in three actions
If you remember only three things about how to select water filter for home, remember this: (1) test your water, (2) match technologies to the contaminants you actually have, and (3) buy certified systems and plan maintenance. Start with a lab test or your CCR, shortlist systems certified for your target contaminants, calculate five-year costs and maintenance, and choose whether POU, POE, or both are right for you. After installation, always retest to confirm the system performs as advertised.
If you want, use the checklist from Step 13 to evaluate models on product pages like https://yourwatergood.com/, and make sure to collect certification documents from the seller before paying. Choosing a water filter is a combination of science and practical tradeoffs — with a test in hand and the steps above followed, you’ll be able to select a system that protects your family, fits your budget, and stays reliable for years.