
How To Change Whole House Water Filter — Complete step-by-step guide for homeowners
Replacing a whole-house (point-of-entry) water filter is one of the most cost-effective maintenance tasks a homeowner can do to protect plumbing, appliances, and the family’s water quality. If you searched how to change whole house water filter, this guide will walk you through everything you need: how whole-house filters work, when and why to change them, safety and tools, clear step-by-step procedures for common system types, troubleshooting, tips to extend filter life, responsible disposal, and a simple maintenance plan you can follow year after year. Links to reliable product catalogs and replacement parts are included so you can verify compatibility and buy cartridges: https://yourwatergood.com/ and https://yourwatergood.com/shop/.
This article is written for homeowners and DIY-minded people who want a clear, safe, and practical resource — read in order or skip to the sections you need.
Quick overview: what a whole-house filter does
A whole-house water filter (also called a point-of-entry or POE filter) treats water as it enters your home so that every faucet, appliance, and tap receives conditioned water. Common whole-house setups include:
- Sediment prefilters (cartridge or backwashing) to trap sand, rust, and particulate.
- Carbon vessels to remove chlorine, taste, and odor.
- Media tanks for iron, manganese, or specialized contaminant adsorption.
- Softening systems (ion exchange) to reduce hardness — often paired with filtration.
Because these systems treat all household water, their cartridges/media are larger and need less frequent replacement than under-sink units, but the replacement procedure can be heavier and sometimes requires two people or simple plumbing steps.
When to change a whole-house water filter
Follow manufacturer guidance first, but use these practical indicators:
- Scheduled interval: Many sedimen/carbon cartridge systems recommend 3–12 months depending on water quality and cartridge capacity. Backwashing systems have longer media lives but periodic media refreshes.
- Reduced flow or pressure drop: If multiple taps show weak flow, a clogged filter may be the cause. Check pressure gauges if installed.
- Return of tastes or odors: If chlorine taste returns, carbon media may be exhausted.
- Discolored water or staining: Visible particles or rusty water indicate an overloaded sediment filter or failure in iron removal media.
- After disturbances: Heavy rains, nearby plumbing work, or municipal activity can spike turbidity — check and replace filters if quality degrades.
Mark the date on each cartridge or tank after replacement and keep a log. This removes guesswork and prevents prolonged operation on exhausted filters.
Safety and preparation — what to do before you start
Changing a whole-house filter involves water, weight, and sometimes simple plumbing. Safety first:
- Shut off the main water supply to the house before touching POE filters.
- Relieve pressure by opening a downstream faucet (lowest point or an outside hose) to drain water from the pipes.
- Turn off electrical power if the system has powered components (electronic controllers, pumps, UV).
- Wear gloves and eye protection if you’re handling dirty cartridges or media.
- Have towels, a bucket, and rags ready to catch drips. Place a tarp or cardboard under tanks to protect flooring.
- Work with a partner for heavy media tanks or full housings — safety and control are important.
- Keep tools and spares on hand: housing wrench (for cartridge housings), adjustable wrench, screwdriver, replacement O-rings, food-grade silicone grease, and replacement cartridges/media.
Finally, read the manufacturer’s manual for safety-specific instructions — many systems have model-specific steps. If you’re uncomfortable with any stage (heavy lifting, soldering copper pipes, electrical), hire a licensed plumber.
Tools & supplies checklist
Most whole-house filter changes require a modest set of tools:
- Housing wrench (for big cartridge housings)
- Adjustable wrench and channel-lock pliers
- Screwdrivers (flat and Phillips)
- Utility knife or tubing cutter (if replacing tubing)
- Bucket and towels
- Replacement cartridge(s) or media as specified for your system
- Spare O-rings and food-grade silicone grease (do not use petroleum grease)
- Marker to date new cartridges
- Pressure gauges (optional) to check ΔP before/after replacement
- Two people on hand for heavy housings or media vessels
Having everything staged before you begin will make the job faster and reduce the risk of mistakes.
Types of whole-house systems and how the procedures differ
Before we go step-by-step, identify which system you own — the exact replacement process depends on the type.
- Big cartridge housings (simple POE) — Common and relatively easy: one or more large screw-off housings hold 10″ or 20″ cartridges. These are replaced like a giant under-sink filter.
- Multi-cartridge bank — A manifold or bank of housings in series. Replace cartridges individually or all at once; follow recommended order (typically sediment first).
- Backwashing media tanks — Large tanks filled with sand, anthracite, or catalytic media; these are cleaned by automatic backwash cycles. Media replacement is infrequent and often done by a service tech.
- Carbon vessels / packed bed tanks — Vessels filled with GAC or catalytic carbon. Refill frequency depends on capacity; replacement often requires drawing down media and refilling (often pro-handled).
- Softener (ion-exchange) — Regenerant (salt) is replenished, resin lasts many years; occasionally resin is replaced by a technician.
- Combination systems (sediment + carbon + softener) — These require staged servicing: sediment first, then carbon, then softener checks.
This guide covers the most common homeowner tasks: replacing screw-off cartridge housings and basic carbon cartridges. For full media exchanges or complex backwashing systems, follow the vendor’s instructions or hire a pro.
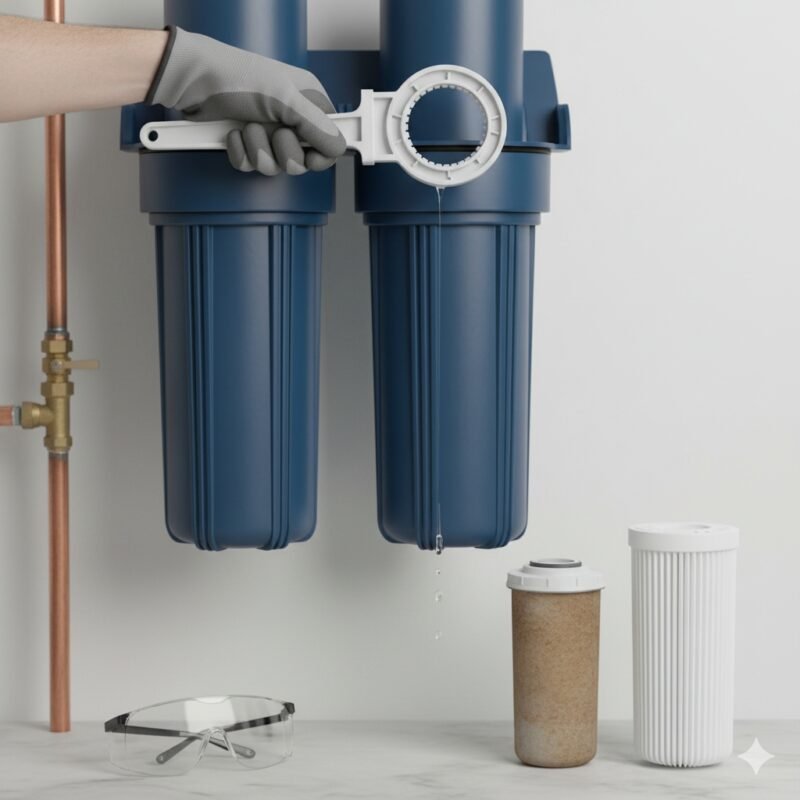
Step-by-step: changing screw-off (cartridge) whole-house filters
This is the most common DIY POE service. The housings are usually large plastic cylinders (often 4.5″ diameter × 10″ or 20″ length) mounted on the cold-water inlet pipe.
1. Shut off and relieve pressure
- Turn off the main water valve (or the valve feeding the filter head if present).
- Open the lowest cold-water faucet in the house and the highest one to assist draining — this relieves line pressure.
2. Prepare workspace
- Place towels and a bucket under the housings. Protect the floor.
- Unplug any powered equipment on the filter train (UV, pumps).
3. Use the housing wrench to loosen
- Fit the plastic housing wrench over the housing and turn counterclockwise. If it’s stiff, give it steady, even force. Avoid metal tools that could crack plastic.
- For very tight housings, wrap a rag around the housing and use the wrench to protect the plastic. Warm water poured over the housing can slightly expand plastic and help loosen stuck threads.
4. Remove old cartridge and inspect
- Tilt the housing to drain into bucket, then remove cartridge. Inspect the interior for unusual sediment, slime, or discoloration — this can indicate system problems upstream.
- If the housing is cracked or cloudy, consider replacing the housing or head assembly as part of maintenance.
5. Inspect and replace O-rings
- Remove the O-ring and inspect for nicks, cracks, or flattening. Always replace damaged O-rings.
- Clean O-ring groove thoroughly of grit, then lightly lubricate the new or cleaned O-ring with food-grade silicone grease. Proper seating prevents leaks.
6. Insert new cartridge correctly
- Ensure the new cartridge is the correct model (length, micron rating). Insert it into the housing in the correct orientation (some cartridges are directional). For multi-stage setups, replace sediment first, then carbon or polishing stages as specified.
7. Reinstall and hand-tighten
- Screw the housing back onto the head by hand until snug, then use the housing wrench to finish with a small additional turn. Do not overtighten — over-torque can damage threads and O-rings.
8. Slowly repressurize and check for leaks
- Slowly open the feed valve to the housings. Watch for leaks at the housing seam and fittings. Tighten slightly if necessary (stop and recheck O-ring seating if leak persists).
- Open downstream faucets to purge air and flush water until clear. Many carbon cartridges require a few gallons of flushing to remove carbon fines. Check manufacturer flush volumes.
9. Record the date
- Mark the date of replacement on the housing or on a maintenance log. This helps schedule the next change.
For houses with two or more housings, do them in sequence, starting with the sediment prefilter. If you encounter stubborn leaks or cracked heads, stop and consult a plumber.
Step-by-step: servicing multi-housing banks and staged systems
Multi-housing systems follow the same housing steps, but sequence matters more.
- Always change prefilters (sediment) first. This protects downstream carbon and specialty filters.
- Replace carbon stages next; they usually require more flushing.
- If you have polishing filters or specialized cartridges (lead, VOC, PFAS), replace them last.
- After all cartridges are replaced, perform a full system flush: open several taps and run water for the volume the manufacturer recommends (sometimes several dozen gallons for large POE systems). This step clears trapped fines and primes the whole system.
For large banks, consider replacing cartridges in teams and stagger replacements if stocking cost is a concern — but avoid leaving any stage old for long, as that can reduce overall system protection.
Replacing media in carbon vessels and backwashing tanks
Large vessels filled with granular activated carbon (GAC) or specialized media are common for whole-house chlorine removal and iron treatment. Media replacement is more complex:
- When media replacement is needed: when taste returns despite cartridge changes, or when vendor-specified bed life is reached (often measured in years or bed volumes).
- Process: Typically the vessel is isolated using inlet/outlet valves, taken out of service, and the media is removed and replaced with new material. Tanks are often heavy and refilling can require a lot of media — a job for two people or a professional.
- Backwashing systems: If you have an automatic backwash vessel, periodic media replacement is still needed and often done by a service company because of the volume/weight involved.
If your carbon vessel is underperforming and you’re not comfortable with media handling, schedule a technician — mistakes in refilling or sealing can cause contamination or poor performance.
Softener and resin checks (if your whole-house system includes a softener)
Softener maintenance usually focuses on salt and occasional resin checks:
- Refill salt as needed (monitor the brine tank). Keep salt clean and high-quality to reduce bridging.
- Regenerate cycles should be set based on hardness and household usage. Check settings after heavy water use events.
- Resin life: ion-exchange resins last many years; if performance declines dramatically, a resin replacement or professional service may be necessary.
- Brine valve and controls: check for leaks and functionality during routine service.
Softener media replacements and valve repairs are commonly handled by service contractors when out of warranty or when mechanical issues arise.
Flushing, priming, and post-change verification
After replacing cartridges or media:
- Flush thoroughly — new carbon especially requires flushing until water runs clear and taste is neutral. Recommended flush volumes vary by cartridge; follow the manufacturer’s guidance.
- Check pressure — compare inlet and outlet pressure if you have gauges. A significant pressure drop across the new cartridge may indicate incorrect cartridge type, incorrect seating, or an upstream restriction.
- Taste and clarity — check water at a downstream tap after flushing. If issues persist, check installation, or test water to confirm contaminant levels.
- Optional: test with TDS or chlorine test strips — a few post-service quick tests help confirm expected reduction in chlorine or particulate.
Record any abnormal observations and the install date.
Troubleshooting common problems
Persistent leak at housing seam
- Likely cause: O-ring not seated or damaged. Fix: depressurize, remove housing, inspect O-ring, replace if necessary, lubricate and reseat.
Sudden low flow across house
- Cause: clogged prefilter or housing cross-threaded. Fix: check housings and remove obstruction or replace clogged cartridge.
Return of chlorine taste after change
- Cause: new carbon not flushed enough or carbon exhausted. Fix: flush longer or confirm carbon capacity.
Air hammer/sputtering
- Cause: trapped air during repressurization. Fix: open several taps to purge air and recheck connections.
If you suspect contaminated media, discoloration, or off-odors that don’t go away with flushing, stop using the water for drinking and contact a water professional for testing.
Responsible disposal and recycling
Used cartridges and spent media create waste. Best practices:
- Check manufacturer take-back: many vendors offer recycling or take-back programs.
- Dry and discard according to local rules: some jurisdictions consider spent media nonhazardous; others have disposal rules. Remove metal/plastic ancillaries for recycling where possible.
- Consider longer-life media: pleated or higher-capacity cartridges reduce disposal frequency.
- Reuse flush water: initial flushes are often large — reuse this non-salted flush water for gardening if safe and permitted (avoid using RO reject where high TDS is an issue).
Document responsible disposal in your maintenance log and keep receipts if required by local ordinances.
Tips to extend filter life and reduce costs
- Install a coarse prefilter upstream to trap large particles and protect finer cartridges.
- Keep a spare cartridge on hand to avoid last-minute purchases and risking operation on an exhausted filter.
- Monitor pressure drops with simple gauge installations — rising ΔP is the earliest indicator of a need for change.
- Address source problems: if well water turbidity spikes after rains, consider settling or pre-sediment options to protect cartridges.
- Buy quality cartridges and media — inexpensive parts may clog quickly or shed fines. Vendors often provide OEM or certified replacements; check model compatibility at https://yourwatergood.com/ and stock replacements at https://yourwatergood.com/shop/.
- Schedule regular maintenance and stick to the calendar — predictable service prevents emergency replacements and protects appliances.
These small investments preserve water quality and reduce long-term cost.
Sample maintenance schedule for a typical POE cartridge system
- Monthly: Visual check of filter housings and system pressure; ensure no leaks.
- Every 3–6 months: Replace sediment cartridge (interval depends on turbidity).
- Every 6–12 months: Replace carbon cartridges (or as rated by the cartridge capacity and water quality).
- Annually: Inspect housing heads, valves, and O-rings; sanitize housings if needed; verify control timers for automatic systems.
- Every 3–5 years: Consider media refresh for larger carbon vessels or professional inspection for backwashing systems.
- Record every service: date, parts replaced, observations, and next due date.
Customize this schedule to your water test results and usage patterns — heavy-use households require more frequent attention.
When to call a professional
Hire a licensed plumber or water specialist when:
- Media change requires heavy lifting or complex handling.
- The system integrates with electrical controls, pumps, or UV devices and you’re not confident handling wiring.
- You suspect contamination or microbial issues after replacement.
- You need a system upgrade, sizing recalculation, or new plumbing modifications.
- You want warranty-compliant service (some warranties require professional installation).
A good pro will also help with commissioning tests, ensuring peak flow performance, and verifying contaminant reductions with lab reports if needed.
Final checklist — change whole house water filter in one pass
- Confirm the system type and buy correct replacement cartridges/media.
- Gather tools and protective gear; have a partner if heavy lifting needed.
- Turn off water and relieve system pressure.
- Drain and place buckets/towels under housings.
- Use housing wrench to remove housings; remove cartridges.
- Inspect and replace O-rings; lubricate with food-grade silicone grease.
- Install new cartridges in correct order (sediment first).
- Hand-tighten housings and slowly repressurize.
- Flush per manufacturer recommendations and check taps for clarity/taste.
- Date and log the maintenance; schedule next replacement.
Changing a whole-house filter is straightforward with preparation, the right parts, and attention to safety. Regular maintenance protects your plumbing and appliances and keeps water tasting clean across every tap. When you’re ready to confirm part numbers or order certified replacement cartridges and accessories, check product specs and stock at https://yourwatergood.com/ and purchase filters conveniently at https://yourwatergood.com/shop/. If you prefer, a local water professional can handle media swaps and larger vessel servicing — but armed with this guide, you’ll know what to expect and how to verify good work.